
Wednesday, July 14, 2010
Kingfisher
Trying to get a study or two done this summer. Here's study I did on a photo of a kingfisher. Probably about 2 or 2 and a half hours all told...


Saturday, July 10, 2010
Keen on Art
With my new place set-up for the most part (minus the internet and still with some really ugly wall colours) I've been been able to get a decent amount of tablet stuff done, when I haven't been sweltering in the heat. It helps that I have very limited internet access until tuesday, so I don't have the option to waste my entire life watching bad shows online.
Anyway, this drawing is dedicated to my brother Nick, who I used to watch play all the Commander Keen games. Here is my alternate rendering of Commander himself in progress. I want to put him in some kind of environment but I'm not sure if I'd rather have him be in his room pretending he's fighting aliens, or actually have him fighting aliens. What is not in debate is that the caption "It's Ogrebird!" will be present no matter what happens.

Anyway, this drawing is dedicated to my brother Nick, who I used to watch play all the Commander Keen games. Here is my alternate rendering of Commander himself in progress. I want to put him in some kind of environment but I'm not sure if I'd rather have him be in his room pretending he's fighting aliens, or actually have him fighting aliens. What is not in debate is that the caption "It's Ogrebird!" will be present no matter what happens.

Monday, July 5, 2010
Guardians of the Portal Gate
Hey all, more COW stuff this week. I have some non-COW stuff that I'll be posting in the next little while, but with moving into my new place, COW has been about all I have time to do recently.
The theme this week is as titled above. I wanted to make my portal guardians with a combination of Mayan architecture with traditional East-Asian sculpture a la Team Ico's art style. I wanted to combine that with a bit of Miyazaki and a few other things. I didn't get to work in it quite as much I would've liked, but due dates are due dates. I think it turned out alright in the end.

The theme this week is as titled above. I wanted to make my portal guardians with a combination of Mayan architecture with traditional East-Asian sculpture a la Team Ico's art style. I wanted to combine that with a bit of Miyazaki and a few other things. I didn't get to work in it quite as much I would've liked, but due dates are due dates. I think it turned out alright in the end.

Thursday, June 17, 2010
The Final Revelation
Here's the finished Revelations piece. It's not as cleaned up as I had hoped but I was running short on time. Hope you enjoy it. I had a lot of fun with it, even if I was a bit rushed on it.


Friday, June 11, 2010
Revealed
Hey guys, so this week's Creature of the Week topic is Revelations. The creature has to be a re-imagining of "The Beast" from revelations. However the artist wants to interpret it is up to them, but it has to be the harbinger of the apocalypse and it has to bear the "mark of the beast" whatever that may be according to the artist.
Here's what I have right now, after an hour or two of work. I'm trying to get across the feel of the old school Amano monsters from the early final fantasy titles. Here are some images of my inspiration:


Here's what I have right now. And yes, I have the General Electric logo as a placeholder for the Mark of the Beast right now.

Here's what I have right now, after an hour or two of work. I'm trying to get across the feel of the old school Amano monsters from the early final fantasy titles. Here are some images of my inspiration:


Here's what I have right now. And yes, I have the General Electric logo as a placeholder for the Mark of the Beast right now.

Tuesday, June 1, 2010
Supersonic and Interstellar
Hey guys. Last week I entered Enviro of the Week as well as Creature of the Week. The topic was "Interstellar Lighthouse". Also on the docket is this week's Creature of the Week, which is the "Supersonic Spike". I'm not super happy with either, but my enviros are never that great, and the creature I was running a bit low on the time factor and had to rush certain parts of it that I wouldn't have otherwise.


Monday, May 24, 2010
Creature of the Week Tutorial (part 2 of 2)
Here is the second half of the tutorial I began in the previous post.
Step 6: Rendering the Creature
After having gotten a basic idea of what I want the creature to look like from doing it's head, I can now move on to rendering all aspects of the creature. I began to create value and form on it's body, and made the chiton plates on it's arms. You may not be able to tell from these screenshots, but I actually flip my images around quite a bit. I've said it before and I'll say it again, make "flip image horizontal" into a basic hotkey or assign it to a tablet function key. Flipping the image allows one to easily see basic errors and compositional flaws. I began to really establish the cold green reflected light from the leaf below to define the underside's forms. I also decided on defining a bit more of the background. All of this is using basic normal layers doing straight painting. I used a grainy rake brush to get the texture of fibres within the leaves and the twigs, but everything else was a standard spatter brush with "wet edges".
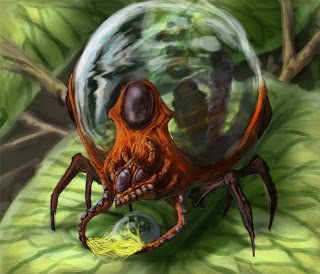
Step 7: Detailing
At this point I really felt that the exoskeleton of the creature was a bit bland. The previous speckling attempt didn't work out so well, I wanted spots that looked and felt good with the scale of the creature, so I created a custom brush for the speckle-pattern set size jitter and x and y jitter on, then began to disperse the pattern on a multiply layer with low opacity. I used a layer mask to get the pattern in the right places in the same way I would do a texture overlay. Then I noticed that the neck tubes didn't really stick out at all, they just sort of melded into the rest of the creature, so I set a layer to overlay and gave them a more desaturated, purpler colour. I gave the lower, smaller droplet some more detailing and smudged it a bit, then I defined the bug being digested in the big drop a bit more and gave it the water effect treatment. This step was really about refining the details to make the creature more believable.
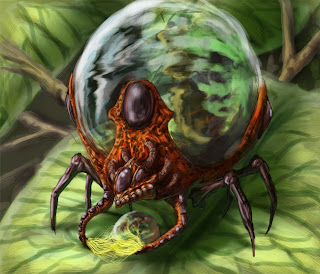
Step 8: Details and Touchups
Only a few things were really left to do at this stage. I used this opportunity to get the main leaf a lot more defined and real, I used a texture overlay of a real leaf, then painted over top of it, then I used multiply layers to define some shadows of where the bug was. I also added details like the fibres on it's legs. Then, I saw a couple of problems of contrast and composition. I defined the foliage in the background a bit more, darkened up the whole thing and then applied a Gaussian blur to most of it to make it really become secondary to the focus (the creature and it's leaf). Seeing that some of the creature lacked form I decided to do a matte highlight on it's light-exposed areas to bring out the darks.
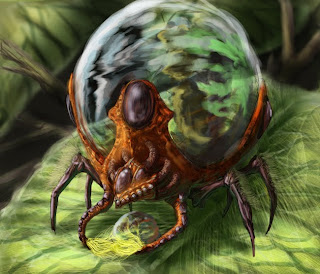
Step 9: Finishing Up
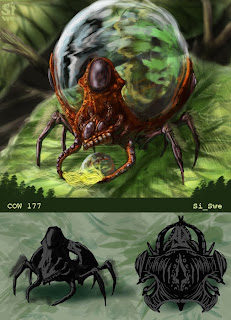
Despite it's title this is the second last step. To go along with the image I used the creature's form to create a silhouette of sorts that would display how the creature looks when it has no dewdrop in it's "crown" so to speak. I then decided to add in a second diagram that would illustrate the top of the creature and what the inside of the "crown" looked like to help explain how it released digestive enzymes into the droplet. After that I created a sort of jungle watermark background and threw it together with the step 8 image. Then I saved it and walked away for about 3 hours. When I came back I had 2 realizations...
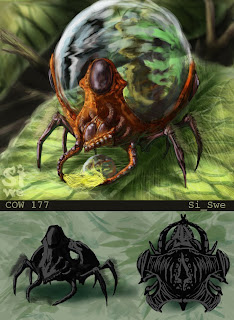
Step 10: Final Touch Ups and Presentation
... The first one was that the leaf it was resting on was incredibly busy. It contrasted poorly with the leg fibres and created a busy image. In addition, the matte highlights washed out a lot of the red I really liked and eliminated a lot of the patterning. I started by simplifying some stuff on the leaf while adding in some highlights in the shadows to show light coming up through the leaf. Then I worked upping the contrast levels between the leg fibres and the leaf colour. Finally I took off the highlight layer and instead defined the shadowed areas a bit more. Then I worked with some final detailing on the creature before calling the image done. I re-paired it with it's counterpart image and used some tree-brushes I had to create a silhouetted treeline on either side of the info bar. Then I added my "Si_Swe" watermark in the corner, trying to make it a close colour to the leaf so as not to make the image busier than it already was, and called it done. Here's the final:
I hope that helps with a bit of understanding on how I work and junk.
Step 6: Rendering the Creature
After having gotten a basic idea of what I want the creature to look like from doing it's head, I can now move on to rendering all aspects of the creature. I began to create value and form on it's body, and made the chiton plates on it's arms. You may not be able to tell from these screenshots, but I actually flip my images around quite a bit. I've said it before and I'll say it again, make "flip image horizontal" into a basic hotkey or assign it to a tablet function key. Flipping the image allows one to easily see basic errors and compositional flaws. I began to really establish the cold green reflected light from the leaf below to define the underside's forms. I also decided on defining a bit more of the background. All of this is using basic normal layers doing straight painting. I used a grainy rake brush to get the texture of fibres within the leaves and the twigs, but everything else was a standard spatter brush with "wet edges".

Step 7: Detailing
At this point I really felt that the exoskeleton of the creature was a bit bland. The previous speckling attempt didn't work out so well, I wanted spots that looked and felt good with the scale of the creature, so I created a custom brush for the speckle-pattern set size jitter and x and y jitter on, then began to disperse the pattern on a multiply layer with low opacity. I used a layer mask to get the pattern in the right places in the same way I would do a texture overlay. Then I noticed that the neck tubes didn't really stick out at all, they just sort of melded into the rest of the creature, so I set a layer to overlay and gave them a more desaturated, purpler colour. I gave the lower, smaller droplet some more detailing and smudged it a bit, then I defined the bug being digested in the big drop a bit more and gave it the water effect treatment. This step was really about refining the details to make the creature more believable.

Step 8: Details and Touchups
Only a few things were really left to do at this stage. I used this opportunity to get the main leaf a lot more defined and real, I used a texture overlay of a real leaf, then painted over top of it, then I used multiply layers to define some shadows of where the bug was. I also added details like the fibres on it's legs. Then, I saw a couple of problems of contrast and composition. I defined the foliage in the background a bit more, darkened up the whole thing and then applied a Gaussian blur to most of it to make it really become secondary to the focus (the creature and it's leaf). Seeing that some of the creature lacked form I decided to do a matte highlight on it's light-exposed areas to bring out the darks.

Step 9: Finishing Up
Despite it's title this is the second last step. To go along with the image I used the creature's form to create a silhouette of sorts that would display how the creature looks when it has no dewdrop in it's "crown" so to speak. I then decided to add in a second diagram that would illustrate the top of the creature and what the inside of the "crown" looked like to help explain how it released digestive enzymes into the droplet. After that I created a sort of jungle watermark background and threw it together with the step 8 image. Then I saved it and walked away for about 3 hours. When I came back I had 2 realizations...

Step 10: Final Touch Ups and Presentation
... The first one was that the leaf it was resting on was incredibly busy. It contrasted poorly with the leg fibres and created a busy image. In addition, the matte highlights washed out a lot of the red I really liked and eliminated a lot of the patterning. I started by simplifying some stuff on the leaf while adding in some highlights in the shadows to show light coming up through the leaf. Then I worked upping the contrast levels between the leg fibres and the leaf colour. Finally I took off the highlight layer and instead defined the shadowed areas a bit more. Then I worked with some final detailing on the creature before calling the image done. I re-paired it with it's counterpart image and used some tree-brushes I had to create a silhouetted treeline on either side of the info bar. Then I added my "Si_Swe" watermark in the corner, trying to make it a close colour to the leaf so as not to make the image busier than it already was, and called it done. Here's the final:

I hope that helps with a bit of understanding on how I work and junk.
Subscribe to:
Posts (Atom)