Wednesday, December 29, 2010

What's the word for the stalactites that are, like, sideways and shit?

Here's a quick little sketch I did today while messing around with eviros. Thought it was pretty cool. Also, a study I did of a mugger crocodile a little while ago, cause why not?


On a different note:
Creature of the Week is currently celebrating it's 200th round! We're celebrating with a massive, month-long challenge designing between one (1) and three (3) creatures. You can choose between the Land, Sea or Air creature briefs. Each category will have it's own poll and own winner, but the top three of each round will go on to another poll which will determine the new mascot of all of COW! It'll be an exciting round to watch so check it out people's progress here.

Tuesday, December 28, 2010

First COW in a while: Mischief Maker

Hey guys. I've been doing a lot of studies and other (more secret) things of late, so the possibility for cool new blog posts has been limited. Hope everyone had a good christmas. Here's the first COW I've done in a while. The theme this week is one Clark and I came up with called Mischief Maker. A creature so insidious that it breaks the very rules of COW. This round we were able to break one of the cardinal design rules of COW. That meant our options were to create a creature: with accessories or clothing, with a humanoid form, with no defined form (i.e. a shifting blob) or a creature which was a plant. I chose a creature with no defined form cause I figured it would be a nice challenge.. I'm mimicking the style of an artist whose work I love, by the name of Andrew "njoo" Hou, a bit. Hope you guys like this one. I downloaded this cool little graffiti font to give something more appropriate with the urban theme in terms of the title frame for the piece.

Thursday, December 2, 2010

It must have been something I ate...

So I'm in the middle of planning round 200 for Creature of the Week which is coming up in mere weeks. Hopefully people will appreciate the concept, but it's going to be a pretty epic round methinks.

I'm really trying to work on creating better enviros and spaces and I have a lot of trouble getting myself to actually work on them. That said, I started doing the suggestions posted in the comments from the post below this. Here is the first on the list of enviros: The inside of a giant beast's stomach. I was going to make it a whole lot more complex than it currently is, but I felt that, as a study, it was where it needed to be.

Tuesday, November 23, 2010

Quick Sketch + Prompt Request

Hey guys, here's a quick dragon head I did in about 20 min. today.

Additionally, I'm trying to practice enviros and I will be using life studies to do some of them, but I'd like YOU, as in the very few people who actually follow May Contain Dragons, to give me prompts for environments to do. I will try and do as many as I can, so suggest away!

Monday, November 22, 2010

Geyser Diving

Hey guys, here's another one from one of my topic selections, the prompt was "Geyser Diver". I had a lot of trouble with the idea generation on this one, I ended up creating this thing after many iterations of many different designs (which looked like wierd, rocky versions of my Wolf in Sheep's Clothing). Anyway, I'm not terribly pleased with how the creature turned out. The environment I am much happier with, though.

Wednesday, November 17, 2010

Best In Show

Hey guys, this week's COW topic was to design a creature that might potentially win the intergalactic pet show. The twist was that the creature needed to be at least 50% green and needed to have scales on at least part of it's body. I came up with this little number. I'm no entirely happy with it, but I guess it's solid enough. I guess I just don't think it was as solid as I think my last two creatures were.


On top of that I decided to participate in ConceptArt.org's Daily Sketch Group, which is a weekly activity where you're given a sentence which gives you all the info you need to make any kind of sketch you like (e.g. Enviro/Creature • 1ST DROPS OF RAIN FALL ON DECAYED HUSK OF DEHYDRATED BEAST or Fantasy Creature • UPRIGHT UPPERCLASS SILK-WORM IS ADORNED IN FANCY DRESS). For this it happened to be: Open-Ended Sci-Fi • ROBOTIC MAN HAS HIT THE WALL. I just messed around for 20 minutes or so and came up with this.

Tuesday, November 9, 2010

On the Subject of Fruming

So the topic I selected for this week's creature of the week was the Bandersnatch. A creature that is mentioned offhand in Lewis Carrol's Jabberwocky as a frumious creature one should shun.

The round had an unexpectedly good turnout. I was really happy with the cool and creative creatures people made with the frumious bandersnatch as their subject. Here's mine. I liked the description I wrote for the piece enough to include it for once...


Alternate, with better colour balancing:


bandersnatch: n An asshole with two mouths. Can be meant in a literal way (e.g. The bandersnatch cackled at me out of one mouth while the other chewed on my prized tulip). Or in a figurative way, signifying a double-entendre, usually meant only for the asshole themselves to understand (e.g. The bandersnatch was complimenting me in one mouth and laughing at my misfortune in the other).

frumious: adj To be mischievious in a seemingly friendly way (e.g. The frumious bandersnatch told me I was pretty while it swiped my prized goddamn tulip from my grasp).

Sunday, October 31, 2010

Wolf in Sheep's Clothing

Hey everyone. I've had a busy week between getting projects finished, doing Creature of the Week and hosting my good friend Josh at my place in Montreal. I did manage to get the creature done this week, though. Or, at least, to a state of finished-ness I'm willing to post in the finals for COW.

Because of Halloween, (lark came up with the idea of a round based on creatures that use the corpse, pelt or skin of their prey to infiltrate the flock. I came up with two ideas but I liked this guy a lot better because he made me laugh. I figured, Wily Coyote's disguises are never successful and I figured my creature's disguise shouldn't necessarily be any good, so I came up with this guy. A creature meant to appear incredibly satisfied with the cleverness of his scheme, unrealizing of the fact it has already caught its prey.

Tuesday, October 19, 2010

First Two Rounds as Mod

Hey guys,
Been a bit since a new creature. I hosted my first round, Heterogenous Heads, in which I asked participants to created a two-headed creature where the heads had to differ from each other in some way. My computer decided to break before I finished that piece, but I can at least give you the work in progress pre-computer breaking.

This week's round was m'colleague's first round as mod. He asked us to create an arctic war beast. The only requirement other than the arctic survival and war capacity of the creature was that it had to incorporate war paint into the design somehow. I created this thing, the Umalo. Hope you like both of these...


Monday, October 4, 2010

The Mod Squad

Hey people that care! Big announcement that isn't new if you I've talked to you in the last little while... I'm a Creature of the Week moderator! Starting this wednesday I will be sharing the Creature of the Week moderation duties with another COW regular, (lark.

Here's my most recent Creature of the Week entry (the last under the great reign of scorge (David Melvin)), the Arrion Lava Swimmer. The theme was glass rings. Giant ones found on an arid desert planet. The idea was to create the creature which leaves these rings in its wake. Thus I created this hot-headed species.

Hope ya like it! I'm very excited to start as COW mod with (lark, so look out for some of my own chosen topics in the near future!

Thursday, September 23, 2010

Blundering

Hey all. Here is my newest creature from Creature of the Week. I ended up with a really strong start on this one, and tried to carry that right on through to the end. I'm pretty happy with this piece. I spent a lot of time with it and I hope it shows. The concept of the week was that it had to have slime production involved somehow and that it's organs should be visible (those are its organs silhouetted in the orange areas. Anyway, this creature's diet is mostly an insanely spicy root after which it's named. Pictured below is the creature rushing to the nearest water source after eating a particularly spicy root. Hope ya like it!

Thursday, September 9, 2010

Full Clip... of bugs?

Hey guys and gals. Here's this week's COW. Had to finish it up pretty quickly because I'm headed home to Toronto for the first time since mid-May. I'm pretty excited to just chill out with the family for a little while.

The theme of this creature of the week was "murderous intent - Gnixxian assassin" because it was COW 187 (187 being the police radio code for homicide). The creature had to be some beast used within high profile assassination. I decided to create the Hollowpoint Burrower Mite, which when triggered by the frequency when cellular devices receive calls, would burrow into it's victim, lay it's eggs, and leave behind a wound suspiciously similar, in appearance, to a bullet hole.

Hope ya' like it, I'm pretty happy with the turn out.

Tuesday, August 31, 2010

Hanging Out

Hey all. It's been a while since my last post, but I've finally managed to get a creature of the week entry out at long last. Here's my interpretation of the 8th Wonder of the World living in one of the 7. The idea is to create a creature which is the reason for or resides in one of the seven wonders of the world. This creature I created was a psychic creature residing within the Hanging Gardens. Nebuchadnezzar used it to weed out traitors in his court, and they were hanged shortly after. I couldn't pass up a pun with the "Hanging" gardens. Anyway, hope you like it.

Monday, August 2, 2010

Trebor POST!

I just got back from a much needed family vacation, filled with much silliness. Here is the final I posted for this past two weeks' COW. It's a bit on the sloppy side, but I think it turned out alright.

Monday, July 26, 2010

First in Flight

Cause all we got is rhythm and timin', we go beyond the edge of the sky.

Sorry, Blackalicious lyrics aside, I'm knee deep in some COW right now after a successful venture in painting my living room, which will be functioning as my digital studio for the next year. Anyway, this week's topic is a two-weeker (last week being the first week of it), so I'm a little late to the game. The topic is Airborne Acrobat. We have to create the immature, adult and elderly forms of the creature. Right now I have a pretty far along image of the adult form and a sketch of the matriarchs with the young. Hope you guys enjoy...


On a side note:
If you're in Toronto this weekend, go see my friend, Callen Schaub's, art show! It's called Fluid Measure. It's at Cream Tangerine Gallery which is at 1087 Queen Street West. It opens tomorrow (wednesday) and has a vernisage on friday, the show goes until August 4th. Check his stuff out at this website. His art is great and he's one of my oldest friends, so if you can, go see it!

Sunday, July 25, 2010

Father Time

Hey all, I did my first real ChOW (Character of the Week) this past week. It's a far more intimidating competition to enter, since it's far more popular and there's a ton of people posting in it constantly. I finally worked up a bit of nerve to enter and put something together for the Father Time round. I had Simon and Garfunkel's "Old Friends" running through my head at the time, and it led me to this homeless interpretation of Father Time.

Sunday, July 18, 2010

Study More!

Trying to get myself to crank out studies. Here's a quick one I did today. Image thanks to about 8 seconds on google image search.

Wednesday, July 14, 2010

Kingfisher

Trying to get a study or two done this summer. Here's study I did on a photo of a kingfisher. Probably about 2 or 2 and a half hours all told...

Saturday, July 10, 2010

Keen on Art

With my new place set-up for the most part (minus the internet and still with some really ugly wall colours) I've been been able to get a decent amount of tablet stuff done, when I haven't been sweltering in the heat. It helps that I have very limited internet access until tuesday, so I don't have the option to waste my entire life watching bad shows online.

Anyway, this drawing is dedicated to my brother Nick, who I used to watch play all the Commander Keen games. Here is my alternate rendering of Commander himself in progress. I want to put him in some kind of environment but I'm not sure if I'd rather have him be in his room pretending he's fighting aliens, or actually have him fighting aliens. What is not in debate is that the caption "It's Ogrebird!" will be present no matter what happens.

Monday, July 5, 2010

Guardians of the Portal Gate

Hey all, more COW stuff this week. I have some non-COW stuff that I'll be posting in the next little while, but with moving into my new place, COW has been about all I have time to do recently.

The theme this week is as titled above. I wanted to make my portal guardians with a combination of Mayan architecture with traditional East-Asian sculpture a la Team Ico's art style. I wanted to combine that with a bit of Miyazaki and a few other things. I didn't get to work in it quite as much I would've liked, but due dates are due dates. I think it turned out alright in the end.

Thursday, June 17, 2010

The Final Revelation

Here's the finished Revelations piece. It's not as cleaned up as I had hoped but I was running short on time. Hope you enjoy it. I had a lot of fun with it, even if I was a bit rushed on it.

Friday, June 11, 2010

Revealed

Hey guys, so this week's Creature of the Week topic is Revelations. The creature has to be a re-imagining of "The Beast" from revelations. However the artist wants to interpret it is up to them, but it has to be the harbinger of the apocalypse and it has to bear the "mark of the beast" whatever that may be according to the artist.

Here's what I have right now, after an hour or two of work. I'm trying to get across the feel of the old school Amano monsters from the early final fantasy titles. Here are some images of my inspiration:


Here's what I have right now. And yes, I have the General Electric logo as a placeholder for the Mark of the Beast right now.

Tuesday, June 1, 2010

Supersonic and Interstellar

Hey guys. Last week I entered Enviro of the Week as well as Creature of the Week. The topic was "Interstellar Lighthouse". Also on the docket is this week's Creature of the Week, which is the "Supersonic Spike". I'm not super happy with either, but my enviros are never that great, and the creature I was running a bit low on the time factor and had to rush certain parts of it that I wouldn't have otherwise.


Monday, May 24, 2010

Creature of the Week Tutorial (part 2 of 2)

Here is the second half of the tutorial I began in the previous post.

Step 6: Rendering the Creature
After having gotten a basic idea of what I want the creature to look like from doing it's head, I can now move on to rendering all aspects of the creature. I began to create value and form on it's body, and made the chiton plates on it's arms. You may not be able to tell from these screenshots, but I actually flip my images around quite a bit. I've said it before and I'll say it again, make "flip image horizontal" into a basic hotkey or assign it to a tablet function key. Flipping the image allows one to easily see basic errors and compositional flaws. I began to really establish the cold green reflected light from the leaf below to define the underside's forms. I also decided on defining a bit more of the background. All of this is using basic normal layers doing straight painting. I used a grainy rake brush to get the texture of fibres within the leaves and the twigs, but everything else was a standard spatter brush with "wet edges".


Step 7: Detailing
At this point I really felt that the exoskeleton of the creature was a bit bland. The previous speckling attempt didn't work out so well, I wanted spots that looked and felt good with the scale of the creature, so I created a custom brush for the speckle-pattern set size jitter and x and y jitter on, then began to disperse the pattern on a multiply layer with low opacity. I used a layer mask to get the pattern in the right places in the same way I would do a texture overlay. Then I noticed that the neck tubes didn't really stick out at all, they just sort of melded into the rest of the creature, so I set a layer to overlay and gave them a more desaturated, purpler colour. I gave the lower, smaller droplet some more detailing and smudged it a bit, then I defined the bug being digested in the big drop a bit more and gave it the water effect treatment. This step was really about refining the details to make the creature more believable.


Step 8: Details and Touchups
Only a few things were really left to do at this stage. I used this opportunity to get the main leaf a lot more defined and real, I used a texture overlay of a real leaf, then painted over top of it, then I used multiply layers to define some shadows of where the bug was. I also added details like the fibres on it's legs. Then, I saw a couple of problems of contrast and composition. I defined the foliage in the background a bit more, darkened up the whole thing and then applied a Gaussian blur to most of it to make it really become secondary to the focus (the creature and it's leaf). Seeing that some of the creature lacked form I decided to do a matte highlight on it's light-exposed areas to bring out the darks.


Step 9: Finishing Up
Despite it's title this is the second last step. To go along with the image I used the creature's form to create a silhouette of sorts that would display how the creature looks when it has no dewdrop in it's "crown" so to speak. I then decided to add in a second diagram that would illustrate the top of the creature and what the inside of the "crown" looked like to help explain how it released digestive enzymes into the droplet. After that I created a sort of jungle watermark background and threw it together with the step 8 image. Then I saved it and walked away for about 3 hours. When I came back I had 2 realizations...


Step 10: Final Touch Ups and Presentation
... The first one was that the leaf it was resting on was incredibly busy. It contrasted poorly with the leg fibres and created a busy image. In addition, the matte highlights washed out a lot of the red I really liked and eliminated a lot of the patterning. I started by simplifying some stuff on the leaf while adding in some highlights in the shadows to show light coming up through the leaf. Then I worked upping the contrast levels between the leg fibres and the leaf colour. Finally I took off the highlight layer and instead defined the shadowed areas a bit more. Then I worked with some final detailing on the creature before calling the image done. I re-paired it with it's counterpart image and used some tree-brushes I had to create a silhouetted treeline on either side of the info bar. Then I added my "Si_Swe" watermark in the corner, trying to make it a close colour to the leaf so as not to make the image busier than it already was, and called it done. Here's the final:


I hope that helps with a bit of understanding on how I work and junk.

Saturday, May 22, 2010

Creature of the Week Tutorial (part 1 of 2)

Hey people who read this! You got a small taste of how it is that I work in the last post I did, but here's a much more in depth look at the way I work. This time doing something I work a little better with: creatures!

So to start off I'll give you the brief this week for Creature of the Week:
A creature that has long sensed the changing of the worlds water and has evolved the ability to carry large amounts of water in its body. The mechanism of storage is the highlight of this challenge and should be your main focus. Does this beast carry it in pouches in its cheeks like some kind of mutant chipmunk? Maybe it has huge balls and nobody could ever figure out why? Bonus points for making the pouches or however this creature carries the water transparent. Size is up to you. Could be a bug, could be a behemoth. Could be a behemoth-bug. Whatever. Make it pretty! Do some research on camels if your in the mood for some reference. Have at it!

So here we go... the following work I did over the course of the last two days. I will be doing this tutorial in 2 posts. The second few stages will be posted tomorrow or monday, depending on when I fully finish up the piece.

STEP 1: Thumbnails:
Sometimes you get a great idea right away and you want to just get started. I had that this time, but it's always great to do a wack of sketches so that you can get some new ideas out there. It really gets your brain working with the topic creatively, and you can generate ideas you get way more excited about than your original. This is what happened with the Aquatic War Beast. Here are the 4 main doodles I did before beginning. Idea 1 was to have some kind of reptilian creature with a large amount of tube-like organs leading into a big tank. Idea 2 is the one I went with, which is to have a creature small enough to carry water droplets without their meniscus breaking. Idea 3 was to have the creature freeze large, hollow crystals onto its back which would store water inside. Idea 4 was to have a two-headed creature with a more cartoony style, where one sucked the water up and one store water in a throat pouch.


Step 2 and 3: Line and Tone
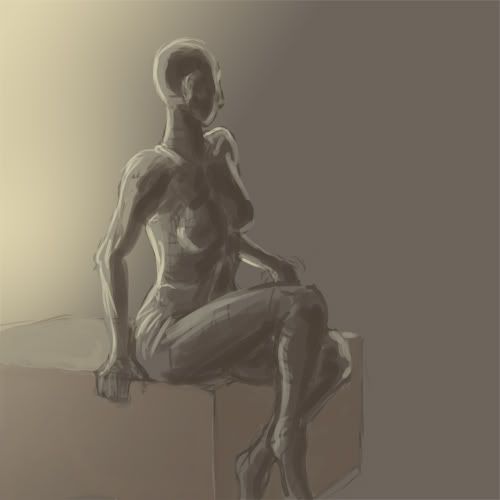
After I've decided on an idea I take a blank "canvas" and start drawing on a multiply layer with a standard round hard brush. I try not to get really in depth with the design at this point, I'm mainly looking for an interesting pose or composition. Something that has a nice silhouette. I decided on this variation on the second design above. I then fill the background layer with a mid-grey. It's a lot easier to establish tone from the middle lighter and darker. I begin to define the form of the creature a little more by creating tone. I used some reference of water droplets to try and get a basic idea of what I'd need to do with it to make it look good... It's a basic start but it forms the foundation of the creature.


Step 4: Basic Colour Scheme
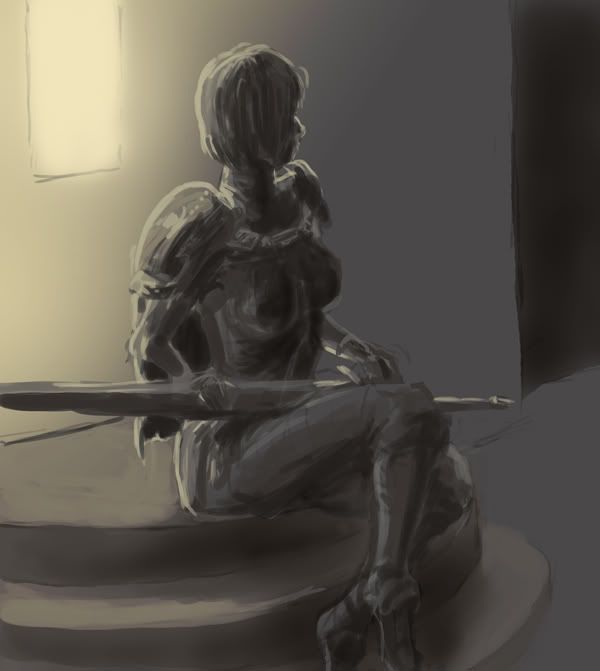
I decided I wanted a sort of red and ash-coloured combo. I new I would have to set the creature on a leafy background and I wanted a colour scheme that would really pop against yellow-greens. Red and purples are the best way to do that. Colours in hand and create a layer and set it to multiply and begin applying the basic colour to everything. It's a good idea, when applying that first layer of colour, to test layer blending options to see which one looks the best. I usually use multiply, but I know others who use soft light, overlay, colour burn, color and vivid light very effectively. I like multiply, but it often flattens shadows to a black-ish tone which is no good, so I often go over the shadows in a more appropriate hue and tone. I then establish a light colour. After that I used a vivid light layer and a chaotic rake brush to make the feelers on it's front tentacles. It was then that I started on the droplets. I applied a light blue to the various parts and began to establish the form of a bug inside the bubble (being digested). After I had it to somewhat reasonable state of colour and tone variance, I used the blur tool to push and pull the forms inside the bubble to give a watery feel. I did a simplified version of the same thing to the small droplet.


Step 5: Establishing context
Now I decided to give the creature a place in the world. I decided on a very basic palette for the background wherein you'd get to see the leaf it was on and some twigs and leaves in the background to establish that the leaf it's on isn't just floating in space. After I did that I decided to establish a bit more yellowy-orange highlights on the creature itself. Simple step.


Step 6: Beginning to Render
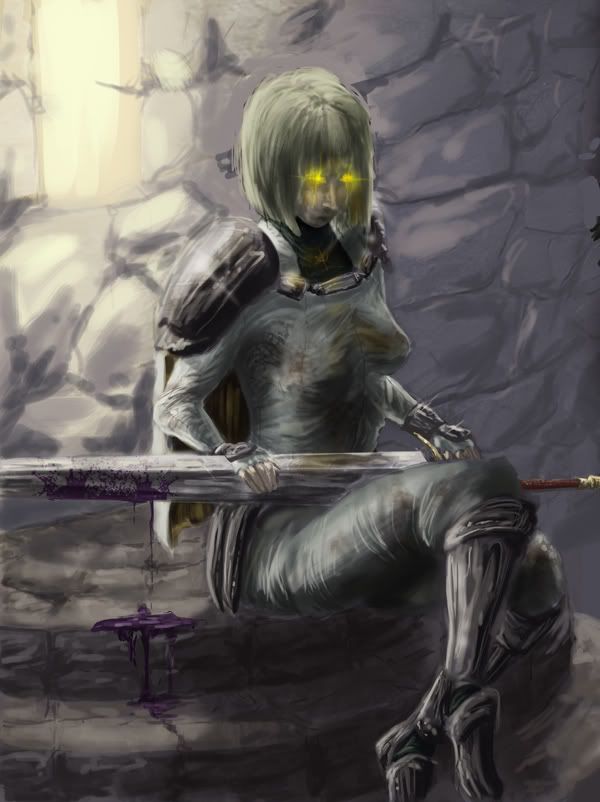
Now the fun part really starts. I decided I wanted a bit of a black speckle pattern on the creatures skin/exoskeleton so I used a dot spatter brush to create some basic speckles. I usually start my rendering with the head because it's the focal point of most creatures and when you begin rendering you're usually willing to put more effort forth at the start. So I began the head, I created a new "normal" layer and used a "spatter brush" (which is a lot like a paint brush) with shape dynamics, wet edges and opacity set to pen pressure. I began to create a darker pattern around the head and neck-tubes and then began using a light orangey-yellow to get some highlights in there. I started to create form on the base of the head by applying green reflective light to the creature's underside. I wanted the eyes to look reflective so I added a bit of the reds from the skin into the eyes. It was at this point that I realized: this creature doesn't need a mouth because the water droplet on it's back digests the food. so I made the previous "mouth" into a central eye and made it to match the others.


(this tutorial will continue in the next post...)

Monday, May 17, 2010

Processing a Claymore

Hey all. Here's something a little different. Here's a few progress shots of me doing a piece of Claymore-based fan art. I can explain bits of the way I work to you through the progress shots.

So I started with a really simple figure study using a reference from a stock photo DeviantArt account. It gave me a basic idea of the forms and proportions, so I just stuch with the basic form. Then I blocked out lights and darks using browns and yellows, which I had originally wanted to be the main hues for the piece.


With that in hand, I began to alter the pose to fit with the subject matter (i.e. the character, Clare, from Claymore). I used an outline layer as a guide for where I would have her hair, nose, armor, sword and the repositioning of the hands. I wanted the pose and scene to just have the suggestion of something just outside of the frame so I had this looking away pose. After the outline I painted those forms in. I then created a multiply layer to get some real shadows creating form on the character. I wanted to create a bit better of a scene so I established a very basic background.


There is an image missing on my photobucket account so you'll have to reference this link if you want to view the next step in the process.
http://conceptart.org/forums/showpost.php?p=2740699&postcount=23
I then proceeded to give some more definition to the background. I wanted to establish a warm light source which means cooling your shadowed areas down, so I adjusted some of the levels to bring a more grey-blue tone to the wall. After that I began to apply colour with a combination of multiply, overlay and soft light layers. I used a standard spatter brush with size jitter set to pen pressure and with wet edges set on to create most shapes. I began to define the costume and get some textures into everything. I used a colour burn layer to create the dirt stains on Clare's outfit.

There is a lot I'm skipping here but to summarize, I was playing around with the background and I decided that the out-of-frame intrigue wasn't working and cropped the frame. I then adjusted the head pose for something a bit more atmospheric.
I began to really focus in creating textures for the whole image. I used some photographs of scratched up metal and made some texture overlays to create the textures on the sword and shoulderpads. It was really about refining the details to a decent level of completion and adding little details like the purple blood on her sword.


Finally, I adjusted contrast and did some colour balancing to really make the image pop. then I applied a hard light gradient in a circular pattern on the window, and adjusted the textures on the back wall with a texture brush for dirt. I think applied a gaussian blur to the wall textures to really draw the focus to the character. All told this piece probably took about 5 hours of work.
Here's the final:

Monday, May 10, 2010

Happy Belated Mothers Day!

Hey guys, a couple things today. Firstly is the Mother's Day themed COW we had this week: The Great White Carnivorous Worm with Young. Thus I present the Trench Maw. Looks like a good mother, eh? Keeping it's young in it's large maw, they make up for the worm's lack of teeth by tearing apart prey that the adult traps within it's mouth.
Second up is a small update on that beast you guys saw the beginnings of in the last update.

Sunday, May 2, 2010

Being the Blue and the Purple

Here's an illustration I'm starting on. I really want to get a sense of the scale of the beast the people on their airship are seeing, so I'll be playing a lot with saturation levels to create space.

Here's also the self-portrait, retouched.